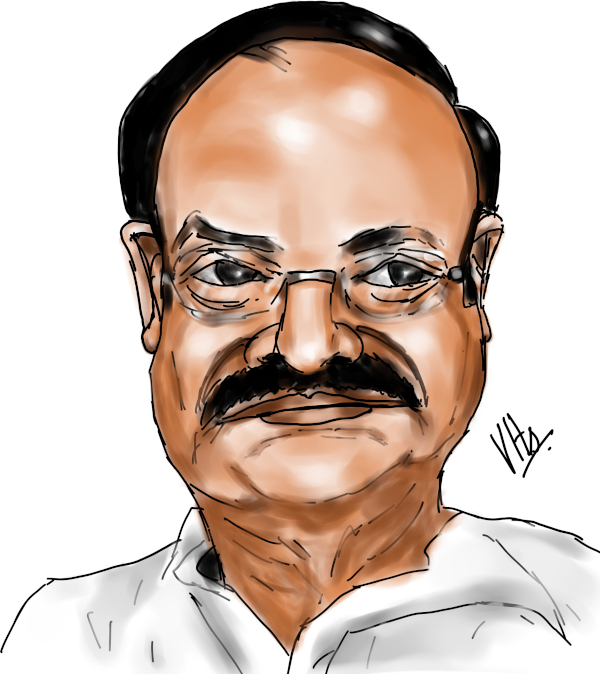
A caricature portrait of the present Vice President of India, Shri Venkaiah Naidu. Painted using Krita with my XP-Pen Artist 10S.
Filed under:
Artwork/Portraits/Caricatures by
Hari
Posted on Mon, Aug 17, 2020 at 16:38 IST (last updated: Mon, Aug 17, 2020 @ 16:38 IST)
A caricature portrait of the present Vice President of India, Shri Venkaiah Naidu. Painted using Krita with my XP-Pen Artist 10S.
Filed under:
Tutorials and HOWTOs by
Hari
Posted on Tue, Jun 23, 2020 at 14:45 IST (last updated: Tue, Jun 23, 2020 @ 16:18 IST)
A video walkthrough on how to create a simple Sickle model in Blender.
Filed under:
Site management by
Hari
Posted on Thu, May 28, 2020 at 11:32 IST (last updated: Thu, May 28, 2020 @ 11:37 IST)
A serious question. I haven't had (genuine) comments in ages, and so I was thinking of completely revamping this website as a static HTML site with my static site generation tool BiaWeb2. This will make it easier to maintain and also easier to move to any web-hosting without much fuss. To me, the main reason to keep this blog dynamic is the comments page. However, it really makes so sense if nobody comments and the only work I need to do is to keep the spam out.
There are a few drawbacks to completely revamping this site. By moving the entire site away from using any PHP, obviously all the links to individual pages will break since all the present links point to PHP scripts. I also need to re-import each and every page of this site to my new site.
So let me know if anybody out there is still interested in commenting on my blog. Even if it is one person, I don't mind keeping this website in its current form. Otherwise, I will be moving the entire website to a static website.
Filed under:
Software and Technology by
Hari
Posted on Fri, May 8, 2020 at 20:48 IST (last updated: Mon, May 11, 2020 @ 21:28 IST)
It's been twenty years since I first remember having got seriously interested in Linux, thanks to PC Quest magazine which distributed a some-what rebranded version of Red Hat Linux 6.1 and 6.2 in the year 2000. I still remember the excitement when I first logged into KDE 2.x. I was diving head first into the unknown world of *nix. In those days, internet connection was pretty bad, we could only dial-up from our telephone lines with the 56 kbps modem. It was almost unheard of to be able to download something like a CD ISO image practically. Hence, PC Quest was my first introduction to serious Linux. I still remember the satisfaction when I got Linux to dual boot with Windows 98. Early on I remember that I had to make boot floppies to boot into Linux due to LILO's 1024 cylinder limitation and those 3.5" floppies used to get corrupted quickly. I even remember the option of installing Linux into a single "image file partition" on Windows and using Loadlin to boot into Linux. (the "image-file" Linux installation was more of a tech demo and it was pretty slow, almost painfully slow for any real productive use). I don't remember the exact technical hurdles I faced back then, but still it was exciting to use alternatives to Windows software like StarOffice (free, as it then was) and I played around with the OS for a while, till I decided that it wasn't worth wasting so many floppies for booting into Linux. I had a lot of fun, but it was also frustrating because the OS didn't support my sound card and NVIDIA graphics and I had to hand-craft the XF86Config file just to get X working. Also I had frustrating times trying to compile software which didn't have RPM packages and yes. hunting down their dependencies as well. Still, I enjoyed Linux as a side hobby though I couldn't give up Windows because... well, games. PC Quest continued to provide RedHat (later Fedora) derived distros with their own branding which I continued to install and learn - each edition was more polished and better than the next. PCQ Linux was indeed my first real intro to the world of Linux and open source.
Later, my real full-time commitment to Linux was when the same magazine gave a copy of Debian "Sarge" CD. Debian was an eye opener and I didn't look back since then. Debian was something different. The installer was tricky but from my previous experience of PCQ Linux, I didn't struggle much. Though of course, PCQ Linux used Fedora and yum, I really became a fan of the Debian package management tools and never looked back since.
With Debian, I finally jumped full time into Linux, though of course I continued dual booting Windows for games and MS-specific stuff that I needed from time to time. However, throughout the 2000s, though I used Linux increasingly for my regular stuff, Linux was still secondary to Windows. Of course, broadband became cheaper and at some point of time, it became easy to download CD ISO images. Of course, by today's standards, it was still very slow, but at least one didn't need to count the telephone dial-up time which used to add significant charges to the telephone bills. But using "ADSL broadband" came with another challenge. Finding a proper way to connect using PPoE. I don't remember the techincal details but PPoE didn't work as smoothly in Linux as in Windows for some reason and the ISPs didn't support Linux at all. They always had some proprietary dial-up tool that worked only in Windows. Luckily that era came to a close when regular routers largely replaced dial-up modems for Broadband connections and ADSL was supplanted by other connectivity options.This was a period of intense experimentation as I tried out various flavours of Linux, including Slackware, Gentoo, Arch, Ubuntu, SUSE/OpenSUSE and Fedora and even custom Kernel compiling. I still remember keeping an extra partition on my system just for multi-booting more than one Linux distro apart from Windows where I could do all the (potentially destructive) experimental stuff. When I got a secondary hard disk, of course, that was also used to multi-boot several Linux distros at once. Of course, despite all my experimentation, I regularly kept coming back to Debian because it just felt right.
The wifi era also introduced a lot of challenges. Getting a laptop to work with Linux became the next challenge. Many Wifi cards were not supported and you had to go through ndiswrapper and installing a Windows driver. Again, firmware was an issue, especially because of the non-free firmware required for certain Wifi chipsets and Debian's free software policy not to package them by default. Despite these hiccups, hardware support has increased substantially in Linux though even today you still get some unsupported chipsets that don't work in Linux. Over time, hardware support has increased considerably and the software ecosystem has also matured greatly.
If I had to point to a single big turning point for wide-spread Linux adoption especially on the desktop, I have to say that Ubuntu in 2004 had a lot to do with it. Without Ubuntu I doubt that Linux might have become as familiar as it has today. Remember, back in 2004, installing Linux was still considered technically challenging, and most distributions at the time did not hand-hold the end users. Though I've used Ubuntu on and off and haven't used it as a main distribution for quite some time now, I still think back and acknowledge that Ubuntu had a lot to do with increasing Linux adoption, especially by non-technical people.
My overall journey can be summed up simply: today I can take Linux for granted and assume it will just work on my system, rather than in early 2000 when I could make no such assumptions. And that's saying a lot.
Filed under:
Artwork/Portraits/Caricatures by
Hari
Posted on Fri, Apr 24, 2020 at 14:50 IST (last updated: Fri, Apr 24, 2020 @ 14:50 IST)
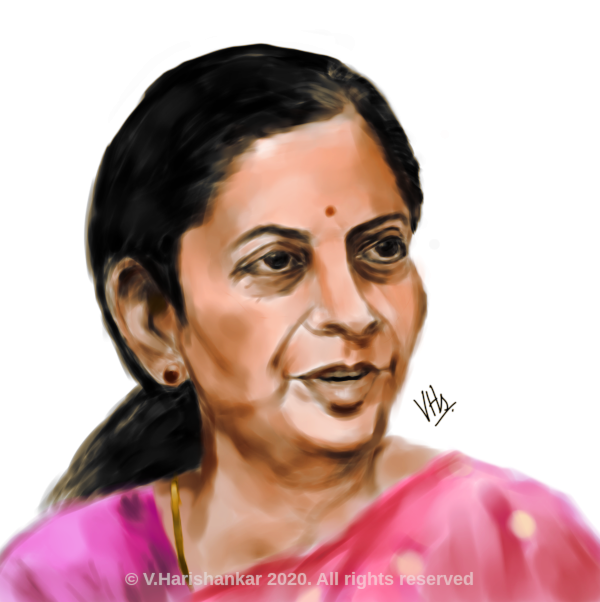
Portrait of present Finance Minister of India, Nirmala Sitharaman. Drawn using Krita with my XP-Pen Artist 10S.
Filed under:
Tutorials and HOWTOs by
Hari
Posted on Thu, Apr 9, 2020 at 11:33 IST (last updated: Thu, Apr 9, 2020 @ 17:51 IST)
In the previous parts, we have seen how to conceptualize our Toy Calculator language and also build our grammar rules in ANTLR 4. To recall, we defined the parsing rules in a top down manner, starting from the conceptual level of a what is a "toycalc" program (a series of statements) and what is a "statement" (can be either of an "operation" on the calculator current value, displaying the current value, or displaying some text). An operation can be one of setting the current value, adding to, subracting from, multiplying with or dividing the current value with some other value.
A brief overview of lexing and parsing
From our grammar, ANTLR will generate code for both lexing and parsing. At the stage of lexing, a stream of characters are analyzed and split into tokens (defined as rules starting with upper case characters in our grammar file). Though the lexing is the initial stage, our lexing rules conventionally are placed below the parsing rules, or optionally lexing rules can be kept in a separate grammar.
The parser then takes a stream of tokens from the lexer and tries to match the grammar, constructing a parse tree in the process.
An important behaviour of ANTLR is that when the ANTLR parser encounters an error in parsing (i.e. comes across tokens not matching any rule) it stops parsing. However, if the tokenizer itself cannot spit out any recognized tokens from the input characters, it continues to tokenize, spitting out a kind of warning for the unrecognized tokens, but does not halt and continues to try and tokenize the remaining input. To change this kind of behaviour, we can either implement an "ERROR" token rule (which will match any character and emit a token, but this rule will come at the end of all other rules). When we define such an error token (as matching any character) this token is fed into the parser, but the parser cannot find any rule to match the token and thus fails. For fine grained error handling, we can override ANTLR's error handling mechanism (but this is beyond the scope of our current project).
Keeping in mind the above, without further ado, let us build the project. Choose the menu Run and click on Clean and Build Project (ToyCalc)
If all goes well, this should generate a series of files of ANTLR 4 in "generated sources". The following files should have been created:
Generated Sources (antlr4)
+---<default package>
|------ToyCalc.tokens
|------ToyCalcLexer.tokens
+---org.harishankar.ToyCalc
|------ToyCalc.interp
|------ToyCalcBaseListener.java
|------ToyCalcLexer.interp
|------ToyCalcLexer.java
|------ToyCalcListener.java
|------ToyCalcParser.java
What is of most interest to us is the ToyCalcBaseListener class (which implements the ToyCalcListener interface). By default, ANTLR 4 generates a "listener" for the parse tree generated by it. What this listener does is to emit certain actions when either entering or exiting a parsing rule. The base listener class does nothing by default. By extending this base listener class, we can code the actions to perform upon entering each rule or exiting each rule. This makes it very easy to implement actions for each parsing rule. The action can be building a node for generating an AST (Abstract Syntax Tree) or it can be some other computation. For our first cut of ToyCalc, we will not go into building any AST since as per our specification (recall part 1 of this article), each statement is executed immediately and unconditionally. For non-trivial programming languages which involves even basic constructs like looping (for or while loops for example), conditional branching (if - then - else or switch statements) etc. an AST is a must, because the parse listener by itself cannot analyze anything other than the parsing rule it encounters. The parser's job is then restricted to constructing an AST from an input source, which can be used as a basis for further processing like generating code etc.
Extending the base listener
Let us extend the base listener to define our customized actions to make our Toy Calculator work. In NetBeans, create a new Java class by right clicking on our namespace, org.harishankar.toycalc inside the Projects tab and clicking New -> Java Class.... Name the class ToyCalcExtendedListener. Make it extend ToyCalcBaseListener. The code should look like this:
public class ToyCalcExtendedListener extends ToyCalcBaseListener {
}
Let us now extend the base listener by overriding the listener methods. The ToyCalcBaseListenerclass inside the generated sources will look like this (stripped of the imports and JavaDoc comments):
public class ToyCalcBaseListener implements ToyCalcListener {
	@Override public void enterToycalc(ToyCalcParser.ToycalcContext ctx) { }
	@Override public void exitToycalc(ToyCalcParser.ToycalcContext ctx) { }
	@Override public void enterStatement(ToyCalcParser.StatementContext ctx) { }
	@Override public void exitStatement(ToyCalcParser.StatementContext ctx) { }
	@Override public void enterEveryRule(ParserRuleContext ctx) { }
	@Override public void exitEveryRule(ParserRuleContext ctx) { }
	@Override public void visitTerminal(TerminalNode node) { }
	@Override public void visitErrorNode(ErrorNode node) { }
}
Note that, enter_ methods are called when the parser enters into the matching rule and exit_ methods are called when the parser exits the matching rule (i.e. after parsing the rule).
First, for our toy calculator, we need to store the current value of the calculator across the life cycle of the parse. For this we will define a private member called calculator_val of the type double inside our extended listener. Also when any Toy Calculator program is initialized, it should be 0. Let us override the enterToycalc method, since it is the entry-point rule of our parser. We will also display a goodbye message to the user when the program is completed. Our class should now look like this:
public class ToyCalcExtendedListener extends ToyCalcBaseListener {
            private double calculator_val;
            @Override
            public void enterToycalc(ToyCalcParser.ToycalcContext ctx) {
                calculator_val = 0;
            }
           @Override
            public void exitToycalc(ToyCalcParser.ToycalcContext ctx) {
                System.out.println ("Goodbye!");
            }
}
Note that the context object ctx is of the type ToyCalcParser.ToycalcContext which holds the parse information for this particular rule. Next let us implement the statement rule, which as per our grammar is defined as:
statement : (OPERATION EXPR | PRINT STRING | GETVALUE);
Correspondingly, let us override the exitStatement rule to implement its functionality (we will perform our action after the rule is parsed). First, we will implement the PRINT functionality, which should simply output a string enclosed in double quotes. Inside the ToyCalcExtendedListener class, override the exitStatement method.
@Override
public void exitStatement(ToyCalcParser.StatementContext ctx) {
    // If it is the print statement then get the token "string" and print it
    if (ctx.PRINT() != null )
        System.out.print (ctx.STRING().toString().replace("\"", ""));
}
The above simply checks if the context has a PRINT token and if it does, it prints the string token STRING. Note that the Java String.replace function is called because we want to remove the extraneous enclosing double quotes (the lexer returns the matched token as is).
Now that we have an action inside our parser, let us check if it works. For this, we need to create a Main class, and implement our parser by feeding it some input. Create a new class called Main in your package folder and add the following code.
public final class Main {
    public static void main (String [] args) {
        // Define a string to parse
       String myProgram = "PRINT \"Hello World\";";
        // Create a charstream from the string
        CharStream prog = CharStreams.fromString (myProgram);
        // Pass it through the lexer and create a token stream
        ToyCalcLexer lex = new ToyCalcLexer(prog);
        CommonTokenStream stream = new CommonTokenStream(lex);
        // Create a parser and pass the token stream to the parser
        ToyCalcParser par = new ToyCalcParser (stream);
        // Create and add a new instance of our parse listener
        // to the parser
        par.addParseListener(new ToyCalcExtendedListener());
        // finally invoke the entry point of the parser
        par.toycalc();
    }
}
(I am not reproducing the import statements. NetBeans automatically prompts requirement to import when you use a class from another package.)
As you can see, the process involves getting some input in the form of a character stream into the lexer, then creating a token stream from the lexer and passing it through the parser. Finally we add our custom parse listener to the parser before invoking the entry rule of our parser. In the above program, for testing purpose, we used a String to define our ToyCalc program, but normally we can read the input from a file using the standard Java IO classes.
Now build and run the program. In our output window in NetBeans, you should see this output.
...
...
------------------------------------------------------------------------
Building ToyCalc 1.0-SNAPSHOT
------------------------------------------------------------------------

--- exec-maven-plugin:1.5.0:exec (default-cli) @ ToyCalc ---
Hello WorldGoodbye!
------------------------------------------------------------------------
BUILD SUCCESS
------------------------------------------------------------------------
Total time: 1.088 s
...
Great! Our program has printed the string Hello World and also the Goodbye! message, which means that our program has correctly parsed the statement and displayed the string and also exited the parser. Play around by adding some more PRINT messages (separated by a semicolon) to the input string and see if it works correctly. Since we have not used a newline character or used System.out.println everything will be displayed on one line. We can trivally implement a PRINTLN statement to the grammar and make that display a string followed by a newline. I leave that as an exercise for the reader.
In the next part we will implement the remaining bits of our Toy calculator language. We will also make our program take a file as an input (as specified in the command line) rather than a hard-coded string.